Cold Baklava is a modern twist on traditional baklava, and although they share the same name, they're actually quite different. Unlike regular baklava, cold baklava, as the name would suggest, is served cold, contains milk, chocolate and much less syrup, making it a lighter and creamier version.

I've always loved baklava, so it's nice to see that more patisseries and stores are selling vegan alternatives, but unfortunately the same can't be said about cold baklava. It's a relatively new dessert, so plant-based alternatives aren't as easy to find. Last year I was staying in Istanbul for a few months, and I had mentioned to one of my aunts, who just so happens to be a great cook, that I was craving some cold baklava, so the next day she surprised me with a big tray of homemade vegan cold baklava; I took one bite and fell in love, and I knew I had to create my version of it.

How does Cold Baklava taste?
If you like baklava, but you find it can sometimes be a little too sweet, then cold baklava is a great alternative! Imagine layers of baked filo pastry and a layer of crunchy pistachios which are soaked in a creamy, sweet syrup and then generously dusted with grated chocolate - what's not to love about that?!
What is the difference between traditional Baklava and Cold Baklava?
The main similarity between the two is that they're both made with filo pastry and then soaked with a syrup, but aside from that, they're actually quite different. Traditional baklava is served at room temperature, whereas cold baklava, as the name would suggest, is served chilled. Another major difference is that traditional baklava remains crisp even after the syrup is poured, whereas cold baklava becomes soft and creamy, giving it a much lighter texture. If you like delicately sweet, creamy and light desserts, then this recipe is for you!

Who invented Cold Baklava?
Cold Baklava was created a few years ago by pastry chef Yılmaz Elaldı who is based in Diyarbakir. He wanted to create a lighter, less sweet version of baklava, and so Cold Baklava was born.
Ingredients for making Cold Baklava
Here's everything you'll need to make this delicious dessert:

Filo pastry: Make sure to use a good quality vegan filo pastry. The Jus-Rol filo pastry is pretty good.
Butter: Any vegan butter will do. I used the Flora plant-based butter block. Just make sure that the butter you use is unsalted.
Oil: I've used sunflower oil, but any neutral tasting oil will do. Do not use coconut oil as it'll harden the texture of the baklava.
Milk: I've used soya milk for this recipe, but cashew milk would also work. I'd recommend using a creamy, neutral tasting plant-based milk.
Sugar: You'll need granulated sugar to sweeten the syrup. Do not use dark coloured sugars or fruit syrups as they'll change the taste and texture of the baklava.
Vanilla: I like to add a touch of vanilla extract to the syrup for extra depth of flavour, but it isn't necessary to add this ingredient.
Pistachios: You'll need some unsalted pistachios to go in the middle layer of the baklava, and some to sprinkle on top. You'll need roughly chopped pistachios for the middle layer, and finely milled pistachios to sprinkle on top. This baklava recipe would also work well with walnuts.
Chocolate: You could use vegan dark chocolate, vegan milk chocolate or, you could leave the chocolate out and just sprinkle ground pistachios on top.

How to make cold Baklava
STEP 1:
Start by preparing the syrup. Add the sugar, soya milk and vanilla extract to a medium saucepan and leave it to boil, on a medium heat, for 5-7 minutes until the sugar has dissolved. Once the sugar has dissolved, take it off the heat and set it aside to cool down.
STEP 2:
In the meantime, add the vegan butter to a saucepan and let it melt. Once the butter has melted, add the sunflower oil and heat for 1 more minute.
STEP 3:
Lay the filo pastry on a large counter, place a medium (12”x8”) baking tray on top of your dough and cut it around with a knife. Once you've cut the dough into your desired shaped, keep in wrapped in a tea towel to prevent it from drying out. Don't throw away the dough scraps as you can use the pieces in the bottom layers of the cold baklava.
STEP 4:
Divide the filo pastry sheets in half, and store 1 half of the pastry sheets wrapped in the tea towel while you prepare the bottom layer of the baklava.
STEP 5:
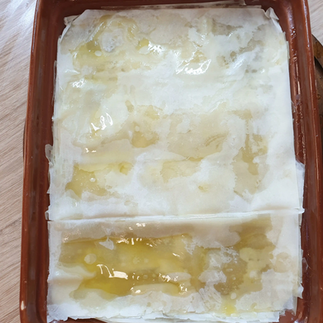
Add 1 spoonful of the butter and oil mixture on the base of your oven tray and spread evenly with a brush, then place one piece of filo pastry into the tray.
STEP 6:
Drizzle the first layer of filo pastry with the melted butter and add another layer on top. Repeat this process until half of the baklava sheets are used up. Make sure not to press down on the filo pastry layers as this will cause the baklava to become dense and soggy. The looser the layers are, the lighter the baklava will be.
STEP 7:
At this stage, preheat the oven to 170 °C (340°F).
STEP 8:
Place the roughly chopped pistachios on top of the filo pastry, and evenly spread them. Repeat the same process you did for the bottom layer of filo sheets. Make sure to add the melted butter between each layer of filo pastry and do not press down as you're adding the layers.
STEP 9:
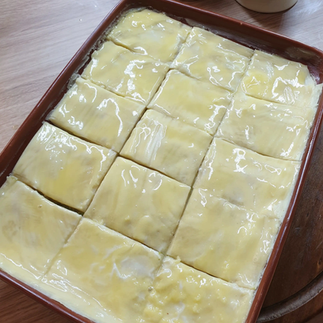
After all the filo sheets are used up, pour the remaining butter on top of the baklava, and spread evenly with a brush.
STEP 10:
Cut the baklava into your desired shape and size, making sure not to press down too much. For this size baklava, I'd recommend cutting it into 12-15 squares.
STEP 11:
Place the baklava into the oven to bake for around 1 hour and 10 minutes, or until the top is browned and crisp. The baking time will vary depending on the oven, so wait until it becomes browned, or you'll end up with a mushy texture.
STEP 12:
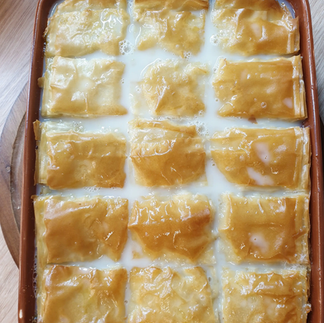
Take the baked baklava out of the oven and let it sit for 5-10 minutes, then pour the milk syrup over it using a ladle. Make sure to pour the syrup on top of each piece of baklava. Let the baklava cool down for around 30 minutes after you've poured the syrup on top, then place into the fridge to rest for a minimum of 1 hour. The longer it is left to rest, the better the syrup will absorb into the baklava. It may seem like there is too much syrup, but It is completely normal to have a bit of extra syrup in the bottom of the tray.
STEP 13:
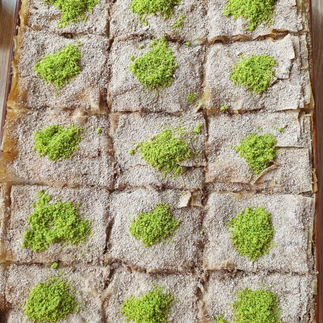
Once the syrup has absorbed into the baklava, take it out of the fridge and sprinkle finely grated vegan chocolate on top. Place the chocolate in the freezer 10 minutes beforehand to make it easier grate. To finish, sprinkle one teaspoon of the finely milled pistachios on top of each piece of baklava. Store in the fridge and serve chilled.
Ingredient Variations
Chocolate - I've sprinkled some grated chocolate on top of the cold baklava, but you can experiment with other ingredients such as grated milk chocolate, cocoa powder or just ground pistachios.
Pistachios - I find that pistachios add a delicious flavour to this recipe, but if you're not a fan of pistachios, you can use crushed walnuts instead.
Soya milk - I've used soya milk for this recipe, but any neutral tasting, creamy, plant-based milk will do. Cashew milk will work well, or, for an even creamier taste, you could use vegan single or double cream.

How to store Cold Baklava
Once the baklava has chilled completely, cover the top with a piece of cling film and store in the fridge. You can store cold baklava in the fridge for up to 5 days. I wouldn’t recommend freezing cold baklava as it can sometimes thicken the texture, and it generally tastes a lot better when served fresh.
Notes and Tips
-The baking time will vary depending on the oven, so wait until it becomes browned, or you'll end up with a mushy texture.
-Make sure not to press down on the filo pastry layers as this will cause the baklava to become dense and soggy. The looser the layers are, the lighter the baklava will be.
-The longer it is left to rest, the better the syrup will absorb into the cold baklava. It may seem like there is too much syrup, but It is completely normal to have a bit of extra syrup in the bottom of the tray.


